
Measure the curve before cutting the cord
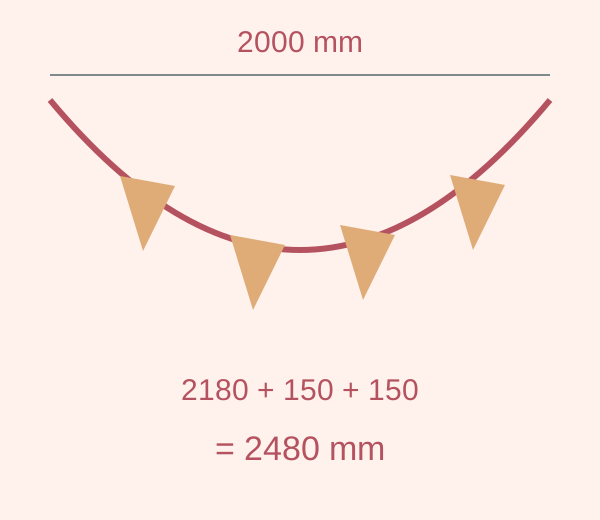
Back to the guideThe distance between two supports is not the length of a hanging garland. Plan its curve with a trial cord and add the fixing ends separately. The example uses invented measurements, not a physical test of the printable.
- Choose suitable supports and a safe height. Keep cords away from small children and do not place them over a cot, a passageway or a heat source.
- Try the drop with an uncut cord or flexible tape. Mark where the flag-carrying section ends; do not straighten the curve to measure it as a chord.
- Measure the flags actually printed and count them. Allow gaps, check that they fit within the marked section, and keep the fixing ends clear.
- Measure along the trial cord, add both ends and cut only after checking the route. Test the attachment on the actual supports before mounting every piece.
| Field | Example or check |
|---|---|
| Fictional route | Supports are 2,000 mm apart. The trial cord following the curve measures 2,180 mm between the marks. |
| Separate fixing ends | 150 mm each in this plan: 2,180 + 150 + 150 = 2,480 mm before any additional reserve you choose. |
| Flag-space check | 12 flags measured at 140 mm and 11 gaps of 30 mm occupy 12 × 140 + 11 × 30 = 2,010 mm. This leaves 170 mm within the 2,180 mm route. |
| What the drawing cannot establish | The curve is conceptual and not to scale. Paper strength, cord, knots and the fixing surface need checking in the real assembly. |
| Cutting record | Support spacing __; measured route __; flag width __; count __; gaps __; left end __; right end __; total __. |
The original documents’ letter indexes remain in their guides. This page solves assembly length; it changes neither their page dimensions nor the need for a print test.
Sources: Dulzura — original-page index and assembly procedure